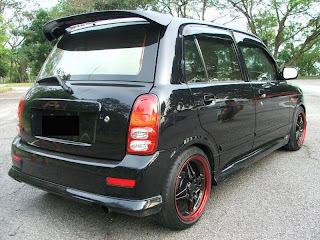
Date: 29th January 2011
Time: After lunch (burp)
Location: GT-Auto, Sunway.
A fellow LYN forumer by the nick of "kcng" managed to organize a group dyno day @ GT-Auto for his Satria Neo Club with very good prices. So I decided to "piggyback" into the group as well. I was curious to see if Banshee was making the power it should. This could tell me if the engine is healthy or needs work...
I didnt manage to stay the entire session as I had an appointment. But I heard that the dyno went pretty smoothly and was a success. Everyone was happy with their results. Well, mostly everyone (have patience Azuma, slowly fix up the issues). And the best suprise of the day was a Proton Gen2 CPS. It was bone stock and even had the cat still on. By just changing the air filter and spark plugs, he managed to get the 2nd highest figure (for Proton engines) of the day that I know of with 120HP. Extremely impressive. Congrats on the results Paul (owner)!
All the cars that attended that day were NA based cars. Mostly Proton's Campro engines with a few Proton CPS engines. There was also 1 MIVEC & 1 VTEC to complete the group...Unfortunately there were no turbos in the group. Would have been nice to have a turbo to give a nice good mix.
Highest figure of the day (that I know of) for Proton engines (and 3rd overall) came from a Satria Neo. Non-CPS. Just the normal Campro. Managed to push out 134.77HP with 151.90nm Torque. HP figure is almost reaching stock Big V B16A on wheel figures and Torque figure is already surpassing B16A on wheel figures... This is impressive, especially for a campro. Whats done to the car, me dunno. Owner has a very decent result, but I guess it still hasnt reached his target with all the mods hes done to the car coz it seems hes slightly disappointed with it...though not as disappointed as Azuma with his Waja CPS...Poor boy...Anyway, the owner of the highest Proton engine figure was kcng himself. The organizer. You may not be happy with your result, but its still an impressive one by Campro standards. Its also pretty decent by B16A standards!
The 2 highest figures came from the only 2 non-Proton engines. 2nd place was a Satria 4G92 MIVEC 1.6. Even with tuning issues and running very rich. The MIVEC managed to get a decent & healthy 147HP. He just needs some management and tune it properly and I believe he should be able to gain even more power from his MIVEC. and after that perhaps a high compression 4G93 block? Heh heh heh
Highest (and loudest) of the day was Banshee, which was also the only non-Proton car there. But of course, I was also the only non-1.6L engine there with a 2.0L under the hood. I would cut my own throat with a blunt plastic butter knife if I didnt get a good result there with a 2.0L VTEC. heh
Heres some pix of Banshee during the dyno..
And heres a video of Banshee's Dyno runs... it was so friggin loud. With all the other cars, people were standing around talking etc etc... But with Banshee's scream, almost everyone had their fingers shoved into the ears, and a few that actually walked out...I couldnt cover my ears due to the video, and I was standing right next to the source of the noise, the side plant hahahaha...Forgive the shaky hands as well as the quality. Vid was with a Sony Ericsson C905 Mobile Phone.
I strongly suggest turning down your volume before playing the vid and slowly increasing it as it goes. Coz the video even starts off pretty loud.
Here's the result of Banshee's dyno
I spoke to Thomas (who was the guy doing the Dyno runs) and he suggested that i engage my VTEC a lil earlier and also go higher compression. Good. Coz its all part of the plan...heheheh
Overall I am happy with the result Banshee got. Though I was hoping for 20kgm torque, getting almost 19 is also pretty decent in my book. Especially considering this is the torqiest (is that spelling right?) car I've ever owned.
Thanks kcng for organizing and also thanks for allowing me to piggyback in the event!
Monday, January 31, 2011
Tuesday, January 25, 2011
Let's Begin Blogging about Banshee
So…ive decided to begin blogging about Banshee…my Civic EG6.
I haven’t done much to the car and it still remains pretty much the same but ill still post what I have done previously as well as the latest update… will also post some extra pictures…
First up. The mod I did even before I got the car.
* Tein Type Flex suspension: Adjustable Hi-Lo & Soft Hard.
* Blox Lower Control Arms
* Ultra Racing Rear Anti Roll Bar
+ Replica ASR Rear Subframe Brace.
Those marked with (*) was originally on Banshee but Ram (ex-owner) took it out and sold it to a friend before selling Banshee to me. 2-3 days before I collected the car, Ram’s friend called him and told him that he decided not to install those parts and wanted to sell it off. So Ram called me and asked what suspension I wanna put in the car.. and once he heard I said “GAB SS” he immediately jumped and made an irresistible offer so I jumped too! Hahaha. I also decided to add the ASR subframe brace one shot while installing all the (*) items. And damn the rear looks hawt as hell!!!
Next up, new headlights… previously it had TYC projector headlamps. I didn’t much like these headlamps coz the low beam was utterly useless and I have to drive around with high beam. They do look sexy as hell on the car, but for me…its function over form (usually). So what I did was I decided to buy the Crystal smoked lamps. The brand I got was Depo from HERE. The price of the lamp complete with side markers (aka signals) was RM480. Installation and bulbs costs separate.
Due to the TYC, I had to purchase some socket or something for the small first lights. And in the end the total cost came up to RM600 for headlamps, signals, bulbs, sockets, installation bla bla bla. Installation was done at the address at the website I linked above.
Before with TYC headlamps. These are all the pix I have since I didn’t have a properly functioning camera when they were still on…Plus pix were taken at bad lighting conditions and my only properly functioning camera is from the Sony Ericsson C905 mobile phone. So don’t complain about quality and what not…
Pix of the car after the new headlamps
Personally, I think the new headlamps looks hell of a lot hotter than the TYC. Even my wife agrees and the first she said is that it looks a lot cleaner. And I of course agree with that statement.
For now, I have yet to drive it at night, I did some adjustments last night at home but didn’t drive out the car til morning. And since its 930pm now and I’m still in the office, itll be my first run with the new headlights at night after adjustment. Only thing is, the roads I’m using are very well lit. ha ha ha ha. If I get a chance to run through dark roads at night with the new headlamps, ill update if I remember (and of course get the lights adjusted properly).
If you’re wondering why I didn’t go for original JDM Stanley lights, its simply because I prefer this one better. I might go JDM one day, who knows, perhaps with USDM signals or Amber signals or whatever, but for now, I LOVE the current headlamps :D
One thing to take note when purchasing headlamps for ur Civic EG. MAKE SURE U GET THE RIGHT SIGNALS. The headlamps are useable for both 2 door and 4 door. But the signals are specific. U CANNOT use 4 door signals in a 2 door and vice versa. So when I bought mine, I made sure that its for the 2 door. They do have the 4 door version, just not sure if the pricing is the same.
Anyway, wanna put more pix of Banshee..more towards the sideplant. From the first pic u can see the Spoon Street muffler which is very quiet and very restrictive.. the Spoon is good for police road blocks etc... but for daily driving and for some fun...i just pull a cable in the cabin and this opens up and goes BBWWAAAAAHHH!!!
(yes, it’s a throttle body :P… custom sideplant..comes out right behind the drivers door... )
This setup is good for “legalizing” ur car when u need it and have extra oomph when u wanna have some fun… only downside is, ground clearance (depending on how the pipe is setup)… for me, I have to put my car at 2 fingers front and back, and I still get clearance issues on some speed bumps. Oh well….
Lastly, the latest pic of the engine bay I have.
OK. Thats it for now..
Next target would be bucket seats. Will most likely go for the Recaro SR3 from DC2-R. At least its original and quality is assured. My initial plan for Replica Bride Low Max GIAS has to be scrapped seeing how it’s a 2 door car and practicality needs to be taken into account. Like I said earlier, function over form first. Theres also the possibility of Replica Bride Cuga….But we'll see…
Tuesday, January 11, 2011
mADmAN's Perodua Kelisa: My Car Evolution Part 08
[Originally Posted: Aug 29, 2009]
Round 8 Update…this will be the final update for Cutie Pie.. coz this is the last mod I did to the car and I have sold the car off as mentioned HERE
So on with the update..
After another long period of no modding… I’ve finally got muh hands on what ive been wanting for a loooooooooonngg time… which is a brake upgrade…so heres wat I posted…
its been so long....now its FINALLY time for a new update....ive been wanting to upgrade my brakes for a VERY long time and sometime ago i posted this in K2Oc and Kelisaclub Forums....its an ad i scanned from a magazine after a K2OC forumer told me about it...
and today....i went to the shop and bought the sports type package which consists of a pair each of Myvi's
1/ Maxtech calipers
2/ Maxtech Vented, slotted & Cross drilled rotors
3/ Maxtech Brake pads.
then went to Kaitenaz racing...my friend's shop in sunway and purchased this...
heres a pic of the calipers, rotos, brake pads and steel braided hose installed. i installed everything one shot...also used Ferodo Dot4 brake fluid while changing the hoses
didnt take pic of the hoses installed at the rear coz its too small oso anyway..
how the new brakes looks hidden behind the 15" X
so now my car is equipped with front myvi aftermarket rotors, calipers and steel braided hoses....and drum brakes for the rear "sweat"...really need to change the rear oso man..heh (ADD: I didn’t change the rear hahahah)
brake feel now is SOOOOOOOOOOO much better from previous..i was having problems with my brakes after a trip to genting...it started squealiing everytime i braked and it wasnt biting as much as before...even on the way down oso i experienced severe brake fade. after that experience..i decided to eat bread this month and upgrade my brakes :D
anyway...for those who wanna know...the maxtech set is direct plug and play to kelisa and should be the same for kenari as well.
piston is a single pot...brake pads duno the rating..but good enough so far.
cant comment on brake bite as yet...as i was told to take it easy for awhile and let the brakes "run in"
ADD: abit of update… the brake bite is awesome with this setup… the car will stop as and when u want it to…pedal is super with almost 0 spongy feel… even did a trip up n down Genting Highlands and brake fade was much reduced compared to stock and there was no squealing after and the bite was still bloody good!
This upgrade was expensive….but worth it… especially considering ALL the parts were brand new.. u can mebbe get other car brake kits 2nd hand for the same price like a Civic (B16A) or Levin etc etc…but again, those parts are used and this is brand new…still worth it :D
ADD: as mentioned, I have since sold the car… below is a pic I’ve posted before..but want to post again…it’s the last moment right before handing the car over to the new owner…
I miss u Cutie Pie.. and thank you so much for the many years of service, reliability and loyalty. Hope the new owner treats u as well as (or better than) how I treated u…so that you may give them the same type of joy u gave me and my wife… and also Raisa.
mADmAN's Perodua Kelisa: My Car Evolution Part 07
[Originally Posted: Jan 08, 2009]
Round 7 Update
After a long while of not modding the car, I finally got something new heheheh…
An adjustable caster bar... to find out wat it does…click HERE, scroll down a lil bit and click play
most of us know when we lower our car... one side of the rear rims will go more inwards compared to the other side, previously i used a spacer to help even things out....now with this bar...adjusted it nicely already and also removed the spacer.... the rear wheels are evenly aligned with the body now
pictars...
(only had phone cam when took this pic)
after installation...
where the magic happens....
been using it for a couple of weeks now with no problems and handling characteristics of the car hasnt changed after installing the bar and removing the spacer. guess this helps with aesthetics...
in case anyone is curious.. i got mine from HERE. hes based in KK Sabah.
ADD: since I installed it I’ve never taken it off…as mentioned above, there were no change with handling etc etc… n the bar remains well n good where it is.
I also don’t have pix of the entire rear with the bar installed… the only pic I had was uploaded to imageshack and imageshack has a tendency of making pix disappear especially if those pix hasn’t been seen/accessed in a long time..
EDIT: click HERE for Part 8 (Final Part).
mADmAN's Perodua Kelisa: My Car Evolution Part 06
[Originally Posted: Oct 14, 2008]
Round 6 Update
got new stuff for the car
KOMO automatic bonnet lifter Very Happy
bought it for RM55 from Lowyat.net forums
ADD: Before I post pix..lemme just say that the bonnet lifters in my car were utter crap… cool…but utter crap.. reason why is coz it was too strong… everytime I open the bonnet it will snap the bonnet up…so I kept being afraid that the bonnet was gonna pop off or something like that…
Also they made the rear of the bonnet sit up abit…not much..just a lil bit. But then when that happens, the front goes down… so the front where the bonnet hook is at is slightly dented upwords due to closing the bonnet.
I have taken them out… and used back the stock bonnet lift and hold thingy… much better imho…..
Take note that this happened to my car only..the seller who I bought it from also sold one to another kelisa.. and that other kelisa had no issues whatsoever with the bonnet lifters… so either my installation was crap…or it just didn’t suit my car or…dunno la…
So on with the pix… (they only had it in yellow at the time)
also got myself a used UR Room bar a couple of months ago from a forumer here....but its so dirty so i decided to clean it up first before installing.... mebbe give it a nice black spray before installing it.. only problem is...i feel so lazy hahahha
ADD: as mentioned in my previous update… I got the UR Room Bar…ive installed it (without cleaning it :P) and theres no pix of it installed unfortunately… back seat clearance is pretty much alright with the Room Bar. The Kelisa is a 4 door after all…
That’s it for Round 6 folks!
EDIT: click HERE for Part 7.
mADmAN's Perodua Kelisa: My Car Evolution Part 05
[Originally Posted: Jun 30, 2008]
Round 5 Update
Remember I said I was sick of the cheapo RM30 bosskit?? Well…here goes…
NRG Slim Wheel Hub (aka Slim Bosskit RM170) + NRG Quick Release Kit (RM300) + Philips Vision Plus Bulbs (RM100) from Kakimotor
i bought the vision plus coz i wanted brighter lights at night...and since aftermarket HID is illegal here (yeesh!!), have to go for this....this is still yellow lights, and supposed to be brighter than them normal lights. and yes they are.... thought havent tested on highway or rainy nights yet.
remember i said i hated my old bosskit?? i bought the quick release kit coz i was sick and tired of my old cheapo RM30 bosskit. the d**n plastic cover is moving all over the place and it was annoying me. so i decided to look for a better one and found the NRG... it was just too cool and too sexy to pass :Drool:
installed in the car with muh momo.
and finally, how cool is this???? heh heh heh
due to the NRG kits. the steering is a lil closer to me now (compared to my old cheapo RM30 bosskit. also the distance between the steering and the signal/ wiper arms on the steering column is further. and its also slightly higher (coz of the angle).
i also went to my friends shop in sunway and got muhself some new spark plugs... Denso Iridium (IK20).
one thing to take note, after my experience with spark plugs on my previous B16A...i am NOT a believer in spark plugs. ive always preferred the cheapo RM30 (set of 4) NGK plugs for performance and throttle response. tested against Bosch Super 4 and NGK XV (the NGK Racing Plugs)
the only reason i decided to install the iridium was because theyre supposed to last longer (about 100k km). and also backside itchy la....hahahahahaha
there are more things to be done for the car... I’e picked up a used Ultra Racing Room Bar.. the bar has already been installed but theres no pic of it…
just to recap wat was done to the car as of this update…(wat i can remember so far)
1/ Changed 1st gen bumper to 2nd gen
2/ Skirtings are original 2nd gen Kelisa Special Edition skirtings all around
3/ Spoiler is a fiber Satria GTi spoiler (yes can fit :P)
4/ Resprayed from maroon to Panther Black
5/ 15x6.5 + 40 Wheels with Falken Azenis ST115 165/50/15 rubbers
6/ D1 Spec Hi-Lo adjustable front and rear suspension
7/ Zenden front 2 point strut and UTR 16mm rear anti roll bar
8/ SSCUS NSI reclining bucket seats
9/ Original Momo Steering + NRG Quick Release Kit + NRG Slim Hub
10/ Gold Tint (Right Cool)
11/ ICE (which was done like 3 years ago)
12/ Full Cabin Sound Dampening
13/ Grounding + Zaptor v2008 Waterproof Edition Voltage Stabilizer
14/ Blitz replica Steel Mesh drop in filter
15/ Changed rear 1st gen wiper arm to 2nd gen wiper arm
16/ Removed external antenna for clean exterior look and installed interior electronic antenna
17/ Larger wind visors aka air press
18/ Installed Ultra Racing Room Bar
will definitely update when theres more things done to the car.
thats it as of now...feel free to comment....will update more if I can…
EDIT: click HERE for Part 6.
mADmAN's Perodua Kelisa: My Car Evolution Part 04
[Originally Posted: Jun 24, 2008]
Round 4 Update
Heres moar pix...the completed exterior makeover....
PICTAR SPAM!!!! lots of pix...couldnt figure out which pic to put so i whack all in only la... so be patient :P
my friends and i had a photoshoot for some cars....and my friends were complaining about how shiny my car was...difficult for them to take decent pix coz can see their reflection in the paint ahahhaha
first u have the basic angles.. front, back, side…
And the other angles...
Other backside views...
and finally... a recap of the evolution :D
me a happy man heheheheh
Theres more updates… so just wait and see laaaaaa….
EDIT: click HERE for Part 5.
Subscribe to:
Posts (Atom)