Monday, September 5, 2011

MOOOOOOOGEN

Some of you may remember one of my PREVIOUS POST about the Razo pedals that I was using. I wasn’t too happy with them as I found that they were HUGE. I removed them and though they felt better..this time around it was a lil far..and as stated in the same post I planned on installing Mugen pedals and that’s what this post is about…

I got the pedals at RM90 from Momentom Motorsports in Taman Sri Muda in Shah Alam. It’s quite expensive compared to a few other sellers out there. But supposedly those are even lower quality that this one. I cant really confirm that claim but I figured, I’d just buy the pedals since I was already there and install it myself. If I were to buy the cheaper ones, I’d probably end up paying some accessory shop to do it for me (since I can be quite lazy at times :P) so I guess it’ll come up to roughly the same.

Take note that the pedals I bought were replicas… and I have to say the quality of these replicas were pretty good. I wasn’t about to spend the significant amount of money on originals as I’m not really a believer in pedals and spending that much money on pedals just to step on them is a lil heartbreaking. I bought these pedals purely for function. To bring the brake and accelerator pedal that lil bit closer to help ease heel n toe. The stock pedals were a lil too far making heel n toe a lil hard with my shoes…the fact that my brake pedal feel is very firm and sensitive doesn’t really help make things easier either.

Here’s a picture of the pedals


Full package contents of the Mugen pedals
Comes with pedals, screws, brackets, hex screws and hex keys (hex aka allan). Even comes with instruction manual in Japanese! They copied almost everything to the T.


The back of the pedals come with double sided tape to help ease the installation… the double sided tape is only meant to assist! It is NOT the final installation…u still need to screw the brackets in place.

From abit of research, it seems the original Mugen pedals also come with double sided tape on the back though the tape looks a lil different and is placed differently.


Here is a comparison of pedal sizes between the Mugen and Razo pedals..


A better picture to show the comparison of sizes. The Razo pedals is significantly bigger than the Mugens


For installation, you will need to refer to the manual as to how to install it in your car. Different cars has different installation for the throttle pedal. An installation in a Civic is not necessarily the same as an Accord. Don’t worry about the Japanese language, the picture in the manuals is more than sufficient and can be understood easily.

Take note that the manual has installation instructions for Honda cars only.. other cars, you’ll probably end up having to figure it out yourself if you wanna use these pedals…but if your car ain’t a Honda…please….PLEASE don’t use Mugens. PLEASE! Its like putting a “Toyota Racing Development” aka TRD sticker on a Mitsubishi. Or a “VTEC” sticker on a Daihatsu. So seriously…PLEASE DON’T!

For the EG6 installation is VERY simple… all you need is the pedal’s full box content (including the hex keys n screws) and a pair of pliers. The only slightly difficult part was the throttle pedal…which is where the pliers come in and makes the installation easier.

First off, remove the rubber from the brake and clutch pedals…pretty easy and can be done with your fingers.

As for the throttle pedal, you will need to “peel” the top part out (only the top part). Use the pliers for this.. you’ll probably end up hurting yourself if you use your fingers…so seriously, use the pliers. There is a tab on the underside of the pedal, so once you peel the the top part out, you just need to slide the rubber thingy downwards to remove it.


All pedals bare naked.


Installation complete…I didn’t manage to get any pictures during installation…but as long as you read the manual, its all pretty straightforward. I didn’t even use the double sided tape on the back and just left it as it is…all I did was screw them in with the appropriate plates/brackets and screws and I was done. The longest part of the installation was simply aligning the throttle pedal nicely.. the brake and clutch were easy as they just slip on to the pedals and screwed in to tighten.


This last picture is a comparison of the stock pedals vs Mugen vs Razo. In this picture you can see the difference in distance between the brake and accelerator pedal


My thoughts about the pedals…I love them. They’re absolutely perfect for daily and track driving (Yes, ive been on track. Story about track will be on another update). Heel n toe is easily achieved as the distance between brake and throttle pedal is perfect.

The mesh like design on the brake and clutch pedal is also very comfortable to use.. even barefooted. It does not bite into the skin at all. Driving barefooted is comfortable all the way and still heel n toe-able.

Ram (ex-owner of my car) did mention once that the Razo’s huge clutch pedal does make it nicer to depress the clutch, especially if you’re using heavy clutches like Ogura, OS, Exedy or other performance clutches.. and with that, I have to agree with him… I still have the Razo pedals with me and I’ll probably end up re-installing the clutch pedal. But that will be further down the road.

Thursday, July 7, 2011

Pineapple?

So Banshee recently had an exhaust leak… I noticed this coz the engine bay was smelling really bad of exhaust fumes…especially from under the intake manifold. After some eyeballing I noticed the flange of the header collector and exhaust pipe was black with carbon. Gasket needed changing.

The collector once had a hairline crack at the flange welds, which has been fixed, and to avoid it happening again (especially after this gasket leak thingy) I decided to install a flexipipe to help give abit more flex when my exhaust is scraping the speedbumps and parking ramps that I have to go through daily. The Flexipipe is also known as "Nenas" or when translated to English: Pineapple. heh


Where the flexipipe will be installed…right after the collector.


All done! Took about 20 minutes. Thankfully the leak has been sealed with a new gasket and the engine bay no longer smells of exhaust fumes. YAY!


Check out the loooooonnnnggg scratch on my centre bullet and exhaust pipe! Wish I could lower my car somemore but this is what’s stopping me. And don’t say skid plates.. the thickness of the skidplates will actually reduce my ground clearance by a few more millimeters hehehehe.


And for those who are curious, a bottom view of my exhaust cutout which the ex-owner did.


Hopefully with the addition of the flexipipe I can scrape the bumps and ramps with peace of mind….

Friday, June 24, 2011

Updates Summary

Its been a LLLOOOONNNGGG time since I’ve updated this blog with Banshee’s on goings. So below is a summary of all the updates that needed updating.

Click on the links below to take you to the post for viewing and reading. Hope you enjoy.

1/ HKS SPF Element

2/ New Brake Pads.. Vibration Issues Solved

3/ Bucket seats... FINALLY!

4/ Pedalling and Shifting

5/ Pretty Bushed...


Lesson learnt: Update Blog as soon as theres something to update otherwise you’ll spend almost an entire day editing pictures, and typing out your posts to keep everything up to date. Its pretty tiring ok?

Pretty Bushed...

Banshee has been running on Blox rear lower control arms (LCA) since before I bought the car. Blox LCAs are pretty much known to have sucky bushings. I’m actually amazed the bushings lasted this long (6-10 months) as compared to what I’ve been reading on the internet.

Either way, I’ve been looking for alternatives to the Blox bushings. I’ve read that you can use a certain Energy Suspension (don’t know part number) bushings to fit into the Blox arms though they require abit of trimming. I was also looking at totally replacing the arms with another brand that has better, more reliable bushings like Skunk2 or Hardrace since theyre both available locally.

I was also looking into custom bushings. Got a couple of quites and some were so expensive that it was cheaper to buy and install brand new Skunk2 arms. But then I stumbled upon THIS THREAD in ZTH. Price was reasonable and PU typically lasts pretty long.

Met up with the guy and chatted abit about the bushings. He claims that he himself is using in his EF Civic and has been using the same exact bushings for the past 5 years. Since the price was pretty cheap I decided to go for it. The whole process took 2 days.

Just so happens that the workshop he deals with is Fast Autoworks ran by Ah Keong whos pretty known among VTEC guys as a good engine builder. Fast Autoworks don’t make the bushings. The bushings are sent to a machine shop somewhere but Fast Autoworks does the arm installation etc.


Banshee sitting on her sexay ass at Fast Autoworks while waiting for the Blox LCA to come back with the new soft pu bushings.


Heres a picture of the Blox LCA with the original bushings.


Closeup of one of the torn bushings.


The Blox LCA with the new soft pu bushings


Closeup of the new soft pu bushings


Banshee feels much better now that the bushings has been replaced. Even in corners she feels very well planted to the ground. I’m happy with the new soft pu bushings and would recommend them to anyone. The guy is a friendly guy and trustworthy too.


Meanwhile, since a couple of my friends also built their VTEC engines with Ah Keong, I asked him to check on some issues I had with Banshee. My idle was very erratic and pretty low. It could go as low as 450rpm. Aircond was practically useless during these times as the engine would just die.

Ah Keong also mentioned that the car felt slow. Especially at the bottom end of the rev range. After some checking he noticed that my cam setting is a little off and that my adjustable cam gear was also slightly off. He reset the cams properly and the car felt much better. This actually also helped with the idle. But it was too high at 1.5krpm. Sometimes even shooting up to 2krpm. He decided to try and change my IACV with a used unit he had. Idle went back to normal.

So now Banshee feels much better overall. Idles well. Aircond is useable again. No worries about bushings. Power delivery is nice and good. Even the VTEC kick is more noticeable now.

Its all good. Now all I have to do is wait for the next open track day at SIC and hope I have the money for their ridiculously priced entry fee.

I seriously hate Khir Toyo for demolishing BT3 track. Track day every weekend and very reasonably priced. I could go for 4-5 track days in BT3 with the price that they charge for ONE SIC track day. Last heard hes on trial for corruption... HA HA HA HA HA HA.... DIE MOTHERFUCKER DDDIIIIIIIIIIIIEEEEE!!!

Pedalling and Shifting

When I bought Banshee, she came with Razo pedals which I thought were HUGE! So I decided to remove them.

Here are pix of how close the brake and throttle pedal are….


With my feet on the brakes, its almost touching the throttle (actually it sometimes does)


After removing, theyre’re definitely further away. You can see the huge difference.


I plan on installing the Mugen pedals to bring the brake and throttle just a little bit closer. But I gotta admit. Heel n toe is easier now without the Razo pedals.

For the clutch, I plan on installing the Razo pedal as its much bigger than the Mugen. Pressing on the big clutch pedal actually feels nicer compared to the stock pedal. Will update when the Mugen pedals are in.


Next update is about my shifter. I got myself a custom shifter extender. A friend of mine organized a group buy and got a machine shop to custom make the shifter extender for us. The shifter is 4” long.

Why shifter extender? Its basically to bring the gearknob up closer to the steering wheel so that your hand travels less from the steering to the gearknob. Take note that this is best paired with a quick shift.


Take note that Honda Shifters and gearknob has a thread of 10mmx1.5mm which is different from most other cars.


Installation is pretty straightforward. But even that I managed to screw up. LOL. Keep reading and take note of the nut position and what I say about it.

All u need is a size 14 spanner and ur good to go. First of u remove the gear knob obviously.


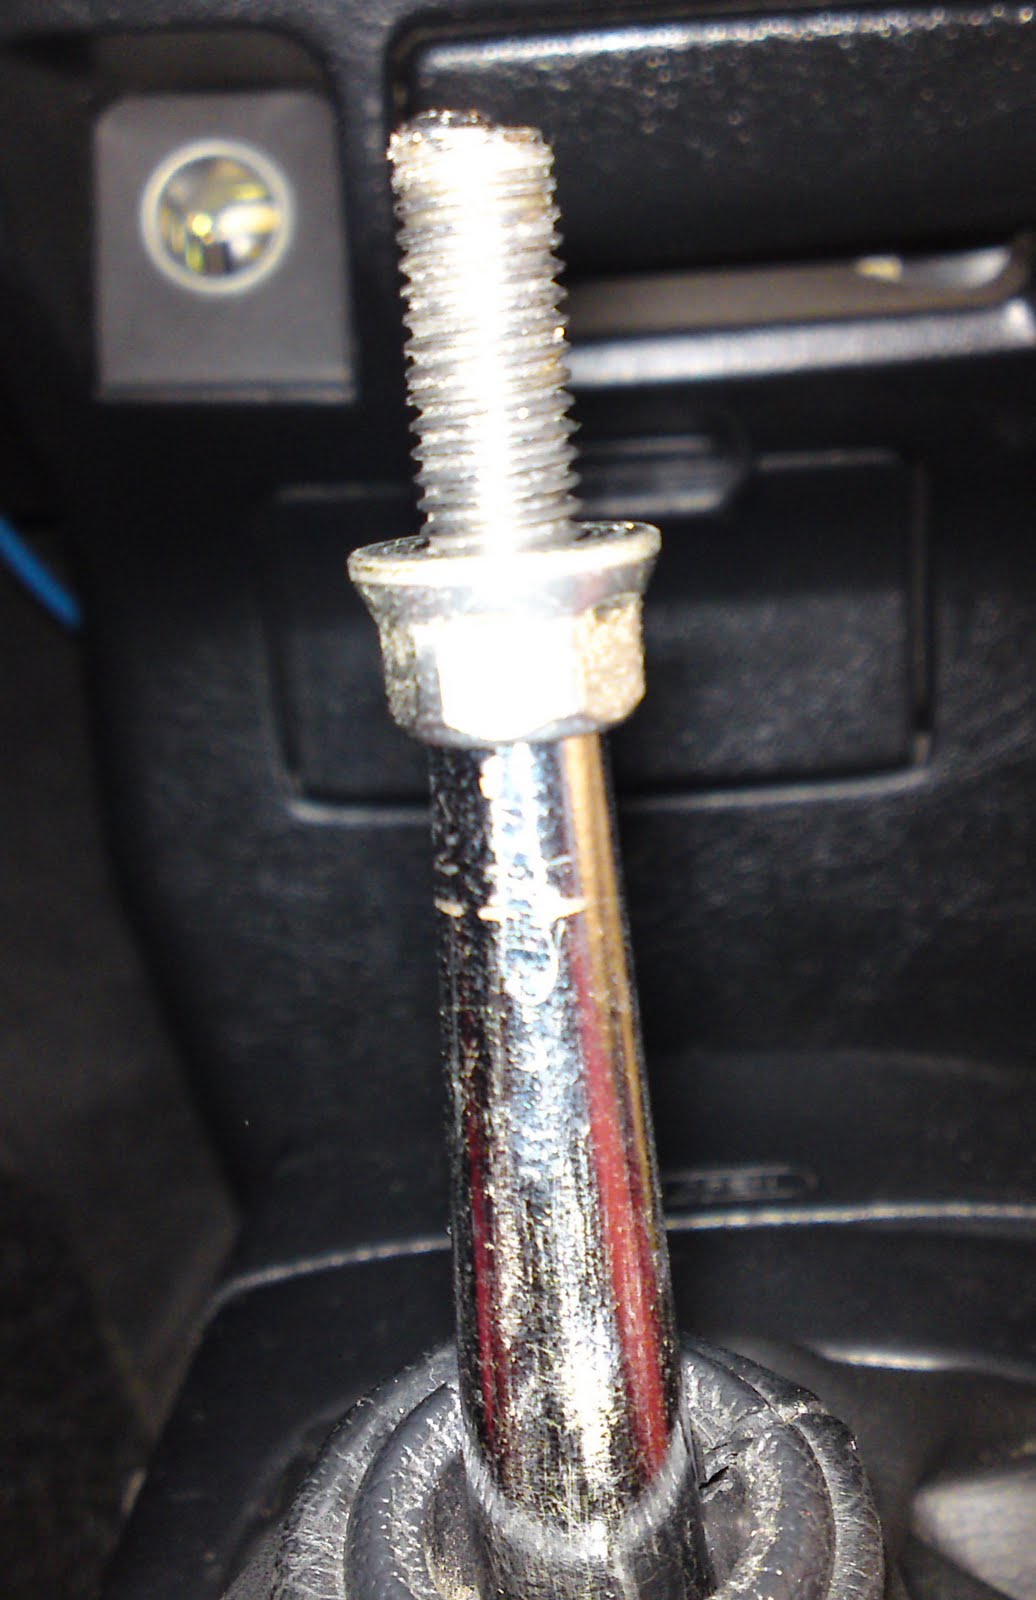
Then you screw in the extender ON TOP of the nut.
NOTE: the picture has the nut on top… this is WRONG! It should be at the bottom.


Once you screw in the extender ON TOP of the nut, screw in your gearknob and tighten it as much as possible. The top thread for this custom unit is a tightening thread so it will be harder to turn the knob the deeper it goes. But just keep going. Then you tighten the nut at the bottom to keep the extender in place. Continue tightening the knob on the extender. Once done, loosen the bottom nut and align the numbers on the gearknob properly so that theyre straight.. and tighten the nut again.


Again, the picture above has the nut installed WRONGLY. The nut should be at the BOTTOM of the extender.

A picture of before and after extender. Remember, the nut position is WRONG.


Here is a picture of the same extender installed PROPERLY in my friend’s (Meor) DC5. Notice the nut is at the BOTTOM.


Yes, after much pain I have managed to put the nut at the bottom the way it should be…but in the process I managed to scratch my extender… but I have covered it with black shiny heatshrink so its all good now. Don’t have pix of it though.

I am really liking the extender. As I mentioned earlier this is best paired with a quick shift or the Type R shifters. With the extenders the throws between gears are further so if you use it with stock shifters, itll be even further. Quick shifts are often very stiff to shift from one gear to another. The extender also helps to reduce this stiffness.

Though the extender is not necessary, I do like having it. The shorter distance between steering wheel and gearknob makes this ideal for track driving. But the longer throws not so much for drag. Though if ur shifting is super fast, im sure you can more than make up for it during drags.

If you’re interested to have one for your Honda, there are commercial shifter extenders available on the internet

1/ Circuit Hero
* The Circuit Hero extenders are 5” long

2/ Rocknob Shift Lift
* If you read the description its originally meant for Jeep. But it can be used as the thread is the same as Hondas. (Rocknob Shift Lift 3" Shifter Extension in 10mm x 1.5mm)
* This extender is 3” long

3/ JTC Extenders
* I really like this one and may pick it up in the future. Its customizable length and also has an angle which you can set to whichever angle you like. You may choose to use or not to use the angle depending on what you prefer.

4/ DIY Shifter Extender guide (it’s a little ghetto though)
* Its ghetto but works the same. Could be cool if you could beautify it.

There are other extenders out there. Even the knock off brand Jasma has a shifter extender which comes with the Proton Waja quick shift kit.

Bucket seats... FINALLY!

So, everyone who I hang with is practically sick and tired of me rambling on about bucket seats… and now, they can breathe a sigh of relief coz I’ve finally bought my buckets! w00t!

Previously I was using stock EG6 94 spec seats. Also known as seat batik. God only knows why they call it batik when the design doesn’t even come close to a batik. People really need to figure out better names for these things… like the rear compartment in the boot is usually referred to as “tong ikan” (fish barrel if translated to English directly)… seriously…..WTF? Where in God’s name did they come up with these names?? Sheesh.

Anyway, pix of my previous seats


And my new current bucket seats.. tadaaaaaaaaa!!!!


Yes, I finally decided to get meself a pair of Recaro SR3 despite me being concerned about the weight of 15kg per seat. I figured they were the best all rounder as they are very comfortable, the bolsters hold you in your seat very well and it has the quick tilt feature to make it easier to get in and out of the back seat. They are also very easily available and prices don’t differ much from one seller to another. I got mine from a friend we call Bob.

Bob gave me a good price which I don’t want to mention here but the seats are from a 2000 spec Civic Type R EK9 and best of all it comes with 2 sets of rails. The original EK9 rails as well as wat Bob told me was the Spoon low down rails (for EK9). Seat condition was almost perfect except for a barely noticeable flaw on the passenger side.

If you look at the picture of the seat pair above closely you will notice that the seatbelt buckle and the rotating adjuster is on the same side. The rails were fitted wrongly in it’s previous car in Japan. This caused some confusion when Bob and his assistant tried to fit it the other way round and make it proper.

Picture of the rails after we removed it to fix it proper. There were no visible markings that I could find on them to say that they’re actually Spoon rails. And the rails look brand new. The black paint on the rails were also top notch as I took a self-tapping screw and tried to scratch it but couldn’t.


Bob (right) and his assistant trying to figure out which rail goes where.


After awhile, it seems that the rails wouldn’t fit properly and must be fitted the wrong way around… I didn’t want this so we fitted the original EK9 rails and tried fitting them in the car. The EK9 rails and EG rails are ¾ the same. Only 1 screw will be out of place. More on this at the end of the post.

Here is Bob and his assistant fitting the passenger seat in the car. This was with the original EK9 rails.


Thankfully while Bob was fitting the EK9 rails onto the driver seat he noticed that he made a mistake earlier with the Spoon rails and realized that they actually can be fitted properly. So they removed the passenger seat and original EK9 rails and fitted the Spoon rails onto the seats. I’m thankful for this coz the EK9 rails were seriously high. It made the seating position so high that I was a lil uncomfortable with it. It was even higher than the stock EG6 seats!

So once the Spoon rails were fitted properly, Bob and his assistant continued to fit both seats in the car. YAY!

Here are pix of the seats in the car (with Spoon rails). Ignore the black-like patches on the seats… that’s just the suede material playing games on the camera lens


I mentioned earlier than the EK9 rails will have 1 bolt out of place. When most people install EK9 rails into an EG they will leave that 1 bolt unbolted. That 1 bolt is the rear inner side of the rail. The rail on the inner side is slightly longer on the EK as compared to the EG. I didn’t want to have any loose corners and Bob agreed with me. So what Bob did was he bolted the rear first which would leave the front hanging out with a gap between the rail and the hole for the bolt. And this is how Bob fixed this and bolted all 4 corners down.


Those golden round washer thingamajiggies are actually washer like stuff from the EK9 seatbelt assembly. With a slightly longer bolt (which I got from my spare rear ARB) Bob fitted 2 washers on each of the gaps and bolted everything down nice and tight. This is just a temporary solution mind you. Though I do believe those washers can take it as they are from a seatbelt assembly. I will be adjusting the rails later on to properly fit into the EG.

The Spoon rails sit lower than the EG6 stock seats. And are definitely MUCH lower than the stock EK9 rails (damn, those were high). I have to lower my steering column to be able to drive comfortably. But the seat position now is very comfortable.

As for the seat themselves, I love them. And so does my lovely wife. She really like those seats. I also have a pair of SSCUS NSI bucket seats which I will be fitting into my wife’s kenari.

I do plan on full bucket seats one day… but I doubt that’s gonna be anytime soon. I have other more important things to do with the car.

New Brake Pads.. Vibration Issues Solved

Next up on the list of updates, is brake pads! I had vibrations at the steering wheel when braking hard. I initially thought the rotors were warped. So I decided to contact LYN forumer maddriver (whos an ex-really driver and currently a mechanic near The Mines) to check up on my brakes. After testing and checking out the rotors, he said that the rotors don’t need skimming. I have already decided to skim the rotors and change the pads, but since he said the rotors didn’t need skimming, I just changed the pads since the old pads, although still thick, weren’t biting that well.

I chose the Rapid Stop 550C pads. The main reason I chose this is coz they’re cheap. RM280 for EK9 pads with install. Unlike the Endless etc which could go up to RM500 and above. But I still do intend on getting higher end pads from Endless or EBC. For now, the RS pads will suffice. I have yet to take the pads to track, heck, I have yet to take Banshee to track. So I can only give feedback on normal day to day use which will come after the pix.

The box itself is faily simple.


Picture of the pads both inner and outer.


And here are the pads sitting behind muh X.


If you’ve never heard of Rapid Stop pads before, its probably because the pads are local (if im not mistaken). One of the reasons why theyre so cheap. I’m not sure who makes them but one of the main dealers is LYN former maddriver which is who I got it from. And if you go to the RAPID STOP WEBSITE you can see the list of other dealers on the “Where To Buy” tab. As you can see, the list of dealers include some pretty well known workshops in Malaysia and also includes our very own rally champion Karamjit Singh! The pricelist and model availability is also on their website. I like this. Everything is out in the open and transparent. So prices should be the same almost everywhere.

As for the pads, maddrivers feedback when I asked about them is that the 550c pads should be able to last for about 10 laps around SIC where it will start to fade. The 800c pads were not really suitable for daily use as it squeals and eats discs but absolutely great for all out revving on track.

As for my own feedback, I like these pads. They work great even when cold. Unlike most other performance pads (which included my cheapo Bendix Metal King in my old EF civic 9 years ago) which needed to be heated up before they’ll bite. The bite itself is about as much as I’d expect (though a lil less than what I'd like, but close enough). I cant compare them to other brands as I’ve never used other brands on this car. And I cant compare them to the old pads (which were Akibono or something like that) coz those pads were burnt, which is why it didn’t bite so well.

Anyway, after installing the pads, the vibration on the steering wheel has gone. So my rotor wasn’t warped and it was just brake pad judder. Phew.

Just one downside of these pads.. sometimes after some REALLY hard revving and REALLY hard last minute braking, I find that they fade a lil too soon. Makes me wonder about the SIC 10 laps claim honestly. But for day to day and occasional revving. They are absolutely bang for buck!

Slotted (and mebbe crossdrilled) rotors are still in the planning. I do intend to install them one day but will have to find some suitable ones. And more importantly have to find the marneeeeeee.