Tuesday, January 11, 2011

mADmAN's Perodua Kelisa: My Car Evolution Part 04

[Originally Posted: Jun 24, 2008]

Round 4 Update

Heres moar pix...the completed exterior makeover....

PICTAR SPAM!!!! lots of pix...couldnt figure out which pic to put so i whack all in only la... so be patient :P

my friends and i had a photoshoot for some cars....and my friends were complaining about how shiny my car was...difficult for them to take decent pix coz can see their reflection in the paint ahahhaha

first u have the basic angles.. front, back, side…


And the other angles...


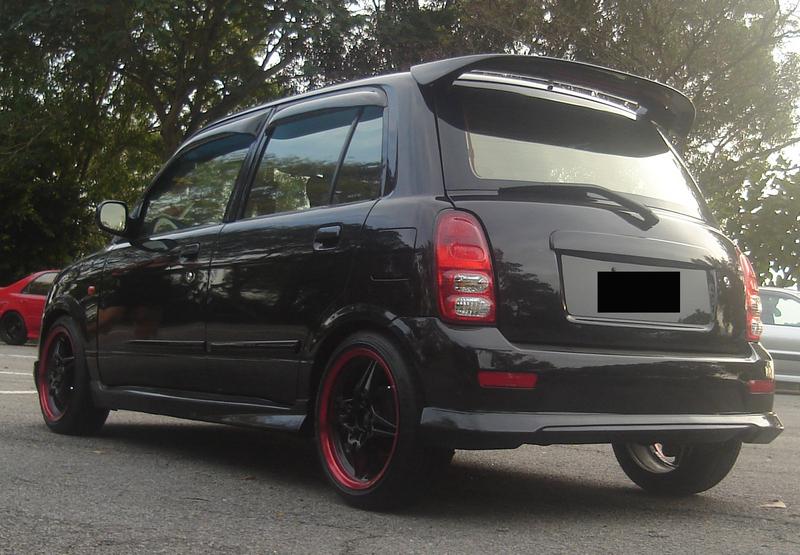
Other backside views...


and finally... a recap of the evolution :D


me a happy man heheheheh

Theres more updates… so just wait and see laaaaaa….

EDIT: click HERE for Part 5.

mADmAN's Perodua Kelisa: My Car Evolution Part 03

[Originally Posted: May 01, 2008]

UPDATE ROUND 3..... FIGHT!!!! :D

heres more updates....

i decided that since the interior is gonna be stripped out....i might as well do the following..

FULL CABIN SOUNDPROOFING!!!! so i sent the car straight to the audio shop from the spray shop :D

(truthfully i kinda regret not doing chassis strengthening aka spot welding while i had the car stripped out)

the brand used is "dampit!"... its the same thing as dynamat and costs about the same as well. only thing is not as much bling as dynamat which i dont really mind coz its all covered up anyway

they used up 12 boxes of this for my car...


installation on the doors


did it on the roof too..


car floorboard also done...all the way from front to back..even the spare tire compartment was soundproofed...this pic theyve just finished the soundproofing and started reinstalling my ICE.

in this pic u can also see my HU and my amps


remember i said no external antenna?? installed this internal antenna.


while the roof lining was out, i also installed the UFO white light for extra brightness... heheheheh


all interior installed... and my 12" sub as well.


and for those who are curious... my full ICE specs

Alpine CDA-9833
Prokick 75w RMS x 4 channel
- Front : Alpine Type 'S' 6 1/2" Components *With Stinger RCA cables & Stinger speaker cables
- Rear : Force Ten 6 1/2" Components *With cheapo RCA cables & Stinger speaker cables
Agako EG-2000D Monoblock
- Alpine Type 'R' 12" Sub (SWR-1221D) in custom in sealed enclosure @ 4 ohm *With Stinger RCA cables & Stinger speaker cables

as for the sound proofing, yes the car is heavier heheheh...but more solid now.

Then, one day.....i had a really bad itch.... so i went to sunway's "horsepower square" to get a cure…A UTR 16mm rear anti-roll bar


the ARB is awesome.... so i decided to go around and look for an ARBS (Anti-Roll Bucket Seats) hahahahhaha

which is when i got muhself some new stuff for the car....

a pair of SSCUS NSI buckets. RM1130 in the SSCUS shop in Kg. Subang. (behind subang airport)

i really wanted the stock RX8 seats for my fish. sadly with the fish being so small, space is limited and i really didnt know if the seats would fit. and i wasnt willing to pay RM1800 and later on to find out the seats wont fit.... so i got the SSCUS instead. my GF (now wife) liked these seats too. so i went for it.


A shot of the SSCUS NSI installed in my Kelisa from the Rear


Love these seats!


i also got an original momo steering...dunno wat model. if im not mistaken it originally came from an EVO3. got it for RM350 off ZTH forums


when this pic was taken i was still using the cheapo RM30 bosskit which i HATE!!! the stupid plastic cover of the thing was broken and moving all over the place. so i thought about getting a replacement. and the NRG v2.0 black quick release kit looks sooooooooooooooooooooo sexy :P

End of Round 3… Await the arrival of Round 4 Update…

EDIT: click HERE for Part 4.

mADmAN's Perodua Kelisa: My Car Evolution Part 02

[Originally Posted: Apr 28, 2008]

OK…so here comes part 2 of the Evolution…

After bodywork is all done..of course its time to paint..so heres some pix of the car right after painting and baking...painted of course in my favourite color! RAWWRR!!

view from the front (no that aint me in the piture)


then view from the rear....


now heres the reason i stripped the interior as well...coz im spraying the interior too.... i hate seeing cars that arent done properly.. and i definitely dont want mine to be one of them...hence the spraying of the interior so that when i open the door all i see is black...and not red while the outer is black (get wat i mean or not ah?? lol)

notice the spare tyre compartment area is also shiny...normally that area isnt... but the dude who did the spraying felt generous lol


heres my spoiler after the painting....can anyone guess wat spoiler it is?? heh heh heh
heres a hint...its neither perodua nor daihatsu... (It’s a Proton Satria GTi spoiler laaaaaa )


moar painted bodyparts


spoiler installed... just to give an idea of how it looks like....rims damn dirty hahahhaahha


picture of the engine bay (and my Zenden Strut Bar :P). remember i said i dont like opening something and seeing the old red?? imagine opening up the hood and seeing the old color... UGH!!! hate that!! want something done...do it properly right?? so i had them paint the engine bay as well...they didnt remove the engine...just removed the necessary parts on the sides so that they could paint it.


the day before leaving the paintshop.. resintalling all the parts that were taken off...(still with bare interior coz my interior is some place else...that will be on the next update heh heh heh)


for those who are curious... the color is "Panther Black". it has a pearl effect... with certain lighting conditions ull see a hint of blue on the car (something like the first pic). but otherwise the black is absolute darkness...

the paint catalog says its a color from BMW. and the catalog and actual paint job looks VERY different..brand of paint used was the high grade Dupont paint. only the best for muh Cutie Pie :D

Another pic ....2 things to notice in this picture (pls ignore the dust :P)...

1/ the new wind visors...replaced the stock small wind visor with a bigger one.

2/ the lack of antenna...my car is a first gen kelisa which means the antenna is above the drivers door. removed it, closed the hole and painted over it. the car doesnt have any external antennas whatsoever to give it the clean exterior look.


End of Part 2…. Part 3 coming soon……hopefully soon :P

EDIT: click HERE for Part 3.

mADmAN's Perodua Kelisa: My Car Evolution Part 01

OK… so heres the real reason I created this blog… to chronicle and basically archive the evolution of my Cutie Pie…My Perodua Kelisa 2002.

I’ve posted all this in a few forums… Most active was THIS THREAD at K2OC.com…that build thread was 17 pages long inclusive of all the Q&A and chit chat…but it actually managed to get almost 80 THOUSAND VIEWS!! Thanks guys for all the support during the build.

So anyway, ill just copy and paste part by part as and when I have free time to do it.

So lets start….


[Originally Posted: Apr 27, 2008]

ive decided to chronicle the evolution of my car...currently the car is ALMOST complete.... the past 3 weeks has been quite hectic for me and the car....

the chonicle will definitely gonna take a few posts...so heres whatever i have first...Very Happy

ive posted some of these in other forums but decided to post here as well...

1st... years ago i broke 3 of the stock 13" rims...so i borrowed rims from my friends proton wira first.. looks better imho than the stock sport rims


then...after drooling for SIX LONG YEARS i finally managed to get muh hands on muh dream rims...these aint easy to find as theyre quite rare and have been out of production for a very long time. if got oso mostly expensive and/or condition like nuts... the car looks d**n high right??


so time to lower the car ...heres info i posted on the abs i got...

take note that the abs are adjustable Hi-Low FRONT AND REAR. it is not soft-hard adjustable though

brand D1 Spec. (Hi-Lo Adjustable FRONT AND REAR)
cost RM1450 inclusive installation at RedZone Sunway.
warranty 1 year

installation is almost straightforward though some modding is required at the thingy for height adjustment at the rear... refer pic below for explaination

entire set


explanation on the mod after this picture.


B needs to be removed. its only attached by a bolt. if not removed itll be hitting with C..and its LOUD :(

problem is....after removing B.... A will also be whacking into C just not as loud as the B and C combo...so they told me i had 2 choices...

1/ increase the height of the car...
2/ cut C to size

i chose option 2. cutting C. they only cut about 1cm only anyway and its exactly at the point where the arrow is pointing

according to them, the reason this happens is coz the abs were mainly made for kenaris and the distance between the parts in a kenari is futher. dont know the truth in this but thats the only thing that requires modification, the rest are plug and play.

this is my car after installation of the abs... rear 2 fingers (its already at the lowest) and front 1 finger with 15x6.5 +40 & Falken Azenis ST115 165/50/15


at the same time i also installed a Zenden 2 point front strut bar... :D

ive already been using these absorbers for over a year and i love them. comfort is most definitely alot lesser than stock. theyre adjustables, and adjustables will definitely be significantly stiffer than non-adjustables.

but to me theyre still quite ok and quite comfortable. my previous Civic EF had super stiff absorbers so i guess im kinda used to stiff absorbers.

so yeah...i love these absorbers.

also i have to take my hats off to the staff of Redzone Sunway. the guys there including the boss were all friendly. and i have to say good after sales service as well. coz when i went there telling them about the problem, they didnt talk much and just got right on to trying to solve the problem. they also kept reassuring me that they will make sure the problem is fixed. they could even chat and joke with me at the same time. basically i would not hesitate to recommend them to anyone.


anyway..........after almost a year of the car looking the way it is... i decided to give the car a full makeover as a reward for being so good to me for the past 4 years...

so next up... heh heh heh

stripped the entire interior... driving the car in this condition is wicked awesome man... so responsive in terms of throttle and handling. really feel like a racing car...only thing lacking is a decent bucket seat...kekeke


removing unnecessary exterior parts as well...(notice the glass has been given a gold tint as well)


the body work preparation...yes yes...going for a complete respray...and by complete i mean inside out...


End of Part 1 for now.. will update part 2 as soon as I can

EDIT: click HERE for Part 2.

Monday, January 3, 2011

Out with the Old... and In with the even Older...

Yeah, u read the title right... Why? well, its car related.

The main reason I created this blog is to chronicle the evolution of my Cutie Pie… aka my trusty 2002 Perodua Kelisa.

But I have recently sold her for a car that I’ve always wanted. A car that I have been drooling at for almost 15 years… the Honda Civic EG6. I’ll still post up the chronicle, as and when I feel like it… but right now… I don’t feel like it ha ha ha ha.

So yeah, I sold my 2002 Perodua Kelisa for an older 1994 Honda Civic EG6.

So this post is to say farewell and thank you to Cutie Pie for almost 7 years of loyal and reliable service and dedication to me and my wife.

My heart sank and I almost cried when I handed her over to the new owner. She will be missed. But at least the feedback I’ve gotten from the new owner has been positive. The guy I dealt with actually helped to buy the car for his sister and both him and his sister as well as a few of their friends really liked the car. The guy even thanked me a few times for selling the car to him. So I believe Cutie Pie will be well loved and well taken care of.

Goodbye Cutie. Love you and miss you…

Some pix of Cutie Pie...


The Evolution of Cutie Pie...


My last moments with Cutie Pie right before the handover… notice the different (heavier :P) rims


And introducing the older… I call her Banshee. Simply coz VTECs scream like a friggin Banshee once they’ve kicked in. And with the sideplant on this car, it truly deserves that name.

The chassis isn’t really an EG6 but a converted one from EH4 which is a local model. Makes things easier during purchase coz u don’t need that friggin stupid AP.

The ex-owner is a nice and friendly chap named Ram, who is a friend of my friend, Meor. Meor pointed me to Ram’s EG that was up for sale and although I hesitated at first due to financial reasons… I decided to jump the gun and get the car. TOTALLY WORTH IT!!! Even though there were some “obstacles” with getting my finances enough for the car, everything came through in time and on Christmas day 2010… My drooling ended. It may not be in my favorite colour black, but that can be changed later down the road :D

So here are some introductory pix to the Banshee…Don’t have much yet, will take more as time progresses..


This pic of the engine bay is old. Not much has changed though. Changes that aren’t in the pic include, Integra DC2 Type R Front Strut Bar, A green color battery (Ameron or something like that la), J’s Racing Oil Filler Cap.


The Official Handover ha ha ha… Ram handing the keys over to me :D


Anyway, as you can see I have transferred my all time favourite “X” rims over from Cutie Pie to the Banshee. I also transferred over my Momo Evo 3 steering wheel as well as my NRG Quick Release. Had to buy a new NRG Slim Hub for EG6 though. My ICE was also removed from Cutie Pie and will be installed in Banshee as and when I get a chance. My SSCUS NSI seats was also removed from Cutie Pie. Wanted to install into Banshee but I’m getting a lot of smack from my friends (including Ram) for wanting to put SSCUS into an EG. So gonna be hunting for other buckets… still unsure of what setup I want for Banshee in terms of Bucket seats.

I haven’t modded much in the car yet. I’m in the middle of moving house, so all finances are going to that first. But I have bought some suspension and handling parts which include

* Tein Type Flex suspension: Adjustable Hi-Lo & Soft Hard.
* Blox Lower Control Arms
* Ultra Racing Rear Anti Roll Bar
+ Replica ASR Rear Subframe Brace.

Those marked with (*) was originally on Banshee but Ram took it out and sold it to a friend before selling Banshee to me. 2-3 days before I collected the car, Ram’s friend called him and told him that he decided not to install those parts and wanted to sell it off. So Ram called me and asked what suspension I wanna put in the car.. and once he heard I said “GAB SS” he immediately jumped and made an irresistible offer so I jumped too! Hahaha. I also decided to add the ASR subframe brace one shot while installing all the (*) items. And damn the rear looks hawt as hell!!!

So I guess this blog will turn from chronicling Cutie Pie to chronicling Banshee instead. Will update as and when theres something to update.

2010 was a VERY eventful year for me… and with Banshee’s arrival, it ended with a loud Banshee scream!! :)